Wednesday 28 November 2012

Christmas Party Decorations

It's been a busy few days and I have been folding what seemed like mountains of white tissue paper! 

Last weekend we had a special Christmas party especially for the ladies and teen girls at our church.  The reason for all my tissue paper folding was to make some of the decorations.  The room we used isn't really like the old traditional church halls, as we have quite a new building, but it is a large open space and it can be a challenge to create a bit of atmostphere in a space like that.  Being a huge fan of Pinterest, and having already tried out some of the decorating ideas I have found on there, we decided the giant pom-pom flower balls would look great around the room.  So I folded and folded and then folded some more and this is what it ended up looking like when you looked up.  It was a big success and received lots of admiring comments.  Best of all, being white (to help create a white Christmas), it also will look great for an upcoming wedding and more Christmas parties.


It was a lovely afternoon and enjoyed by everyone.  One of the fun things we had set up was a cookie buffet full of Christmas shaped cookies, coloured frostings and a large variety of chocolates and candies - all for a fun activity of decorating cookies - a big success!
 
 
These little pearl candy balls were my favourites!!
 
Everyone also made a Christmas Craft.  This was the craft - a Christmas Tree made from Ribbon and Beads. This idea is courtesy of Pinterest found here. 


Once all the activities were over, we had a secret santa and also a delicious afternoon tea.  Here is a picture of my contribution.  I loved how it turned out and it was so easy to make - marshmallows on skewer sticks, dipped partially in melted white chocolate and dipped in either grated chocolate or sprinkles.  It made up a pretty flower posy for the table!  The gorgeous white pot is from IKEA.
 

I must remember this when I am next doing a birthday party for one of my children!!


Friday 23 November 2012

Christmas Gingerbread House

A Christmas Gingerbread House is a family tradition that I remember going right back to my own childhood years.  My mum used to make us a gingerbread house all decorated with lollies (candy) and she also used to make several extras to give away as gifts to family and friends.  They were something quite special and it wasn't like today where you see gingerbread houses in all the stores, back then you had to make your own.


This tradition is something that I have carried through for my own family and it is something my children look forward to each Christmas.  I've had some great years where I cut out the gingerbread pieces and assemble the house and decorate it and everything turns out perfectly, but I also remember one year when we had a particularly hot summer and my gingerbread house was a complete disaster - the walls kept sliding down and the roof caving in, nothing seemed to set hard like it was supposed to.  That year we had to be especially careful when eating it because the walls and roof were all held together with toothpicks and pins!!
 
So once again it is getting near to Christmas and time to make another Gingerbread House!
 
Last year I attempted something a little different and for the first time didn't bake my own Gingerbread, instead I went along to the school where my children attend and joined over 100 other ladies for an evening of decorating gingerbread houses made from kits.  I enjoyed it so much that this year I went along and took two of my daughters with me.
 
 
Imagine a large room full of women and young girls, gingerbread house kits and tables loaded full with colourful candy and you can picture what a fun evening this was!! 
 

Sorting the candy into colours, ready for decorating.  My daughter's eyes lit up, she has never seen such large quantities of candy to choose from and she especially loved that she could pick and choose whatever she wanted.


I think her method for decorating was to put on as much candy as possible!

 
And these are our finished Gingerbread Houses
 
 
I love that we go home with a completed gingerbread house, all wrapped up and ready for Christmas!


Thursday 15 November 2012

Lace Doily Stamps - More Handmade Cards

The countdown is on . . . for the final weeks in our school year that is!  I knew it would be a fast term, but I can't believe how quickly the weeks are racing by ~ and my lists of things that need to be done during these final weeks is growing by the day.  Why is it that this is always the most busy time of the year?  But there is also a lot of excitement that culminates around everything going on, especially with the lead up to Christmas.
 
Like many schools, ours has a presentation night at the end of the year, this one especially for high school students.  We are so proud of our oldest daughter, she has worked very hard this year and been very focused on her school assignments and it was beautiful to see her absolute joy when she received awards for two different subjects this year.  One of those very special moments when you just love being a parent!
 
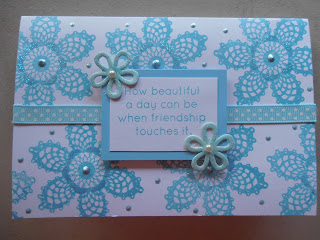
Well with everything else that has been going on, I have actually managed to slip in a little bit of papercraft activity and finally tried out a new set of stamps which I purchased at the last craft show I went to.


The set I used is the one in the top right corner.  They look like little lace doilies in a variety of shapes and sizes.


I didn't have a lot of time and wanted to keep the design simple so I could get a couple of variations made.  I love laces and everything pretty and feminine, so these stamps really appeal to me.


I was even able to color co-ordinate everything, which is very much my style too.  The inks I used were some new ones I purchased earlier in the year from Close to My Heart.  They are so pretty!  The dots are all made using Liquid Pearls and the flowers were actually white flowers and I coloured them to match using my Copic Pens. 


I had to try out one using the Eiffel Tower stamp too!

So there you go, quick and easy, quite literally.  A few more nice cards for the collection of handmade cards.

I hope you have been enjoying your own crafty projects this week!!


Wednesday 7 November 2012

Kaszazz Card Workshop

Well I can't say that I have done very much in the way of craft recently, but I did have the opportunity to go along to a Kaszazz Mega Demonstration evening.  My oldest daughter came along with me and we had a fun mother & daughter evening out together.


We enjoyed the demonstration and opportunity to learn some new techniques we had never tried, particularly with our stamping.   Here is the card we made on the night.


I never really had much of a love for distress inks, but after that night I have definitely changed my views.  The blue distressed ink we used in the card we made was just gorgeous!
 
I hadn't used gloss card in years, but everything in blue was stamped onto gloss card and then coloured using blue distressed ink and a blending tool.  The butterflies were stamped and then punched out with a butterfly punch.
 
We already had the Eiffel Tower stamp at home, so now we have another idea for some inspiration on how to use it.
 
We know a couple of Kaszazz Consultants and have done a few of their workshops over the years.  If you ever have the opportunity to participate in one, I do highly recommend it.  You will have a lot of fun and also make some wonderful looking cards. 
 
And yes, we did do some shopping on the night - courtesy of a $50 voucher the lovely Kaszazz ladies gave out to everyone who attended.  So now we are looking forward to the delivery of our new stamps and inks!